
It can be deceptively easy to mix and master a track, but what happens to the sound when it leaves the speakers?
Our friends at Get That Pro Sound are here to deliver a crash course on sound design tricks 101 that will seduce your listeners’ ears into hearing exactly what you want. Music producers, pay attention!
Using basic knowledge about psychoacoustic principles, you can find creative ways to bring your listeners a more powerful, clear, and “larger than life” experience. By understanding how our ears interpret sounds, we can creatively and artificially recreate certain responses to particular audio phenomena, particularly EQ, compression, and reverb.
1. The Haas effect
Named after Dr. Helmut Haas (who first described the effect in 1949), this principle can be used to create an illusion of spacious stereo width…starting with just a single mono source.
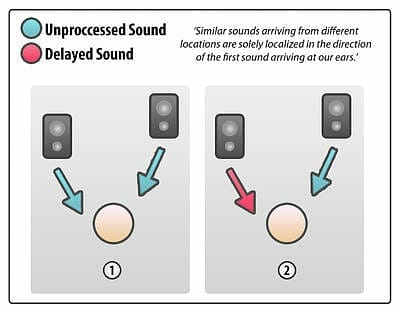
Haas was studying how ears interpreted the relationship between originating sounds and their “early reflections” within a space. His conclusion was that as long as early reflections and identical copies of original sounds are heard less than 35ms after (and at a level no greater than 10dB louder than the original), the two sounds will be interpreted as one.
The direction of the original sound would be preserved, but because of the subtle phase difference, the early reflections/delayed copy would add extra spatial presence to the perceived sound.
The Haas effect in practice
To thicken and/or spread out a mono sound source, it’s a good trick to duplicate the part, and then pan each layer to the sides. Then, you could delay one of the layers by between about 10-35ms. This tricks the brain into perceiving more width and space, while leaving the center wide open for other instruments.
You can also use this technique to pan a mono signal away from a busy center in order to avoid masking from other instruments. At the same time, you don’t want to unbalance the mix by only panning to one side or the other. The answer lies in “Haasing it up” and panning your mono signal both ways.
Consider using slight delays
Of course, there’s nothing stopping you from slightly delaying one side of a real stereo sound. For example, you might want to spread your ethereal synth pad to epic proportions. Just be aware that by doing this you’re also making it more “unfocused.” But for pads and background guitars, this is often entirely appropriate.
As you play with the delay’s time setting, you’ll notice that very short delays result in a pretty nasty out of phase sound. Meanwhile, very long delays will break the illusion, and you’ll start to hear two distinct and separate sounds. You want something in-between.
Find the right balance
Remember: The shorter the delay time, the more susceptible the sound is to unwanted comb filtering when the channels are summed to mono. This is something to consider if you’re primarily making music for clubs, radio, or other mono playback environments.
You’ll also want to tweak the levels of each side (relative to each other) to maintain the right balance in the mix and the desired general left/right balance within the stereo spectrum. You can apply additional effects to one or both sides, like subtle LFO-controlled modulation or filter effects.
A word of caution: Don’t overdo it. In a full mix, use the Haas effect on one or two instruments at most. This helps you avoid stereo spread that sounds like phasey mush.

2. Frequency theory: how masking works
There are limits to how well our ears can differentiate between sounds that occupy similar frequencies of human hearing.
Masking occurs when two or more sounds sit in the exact same frequency. Generally, the louder sound will either partially or completely obscure the other, which then seems to “disappear” from the mix.
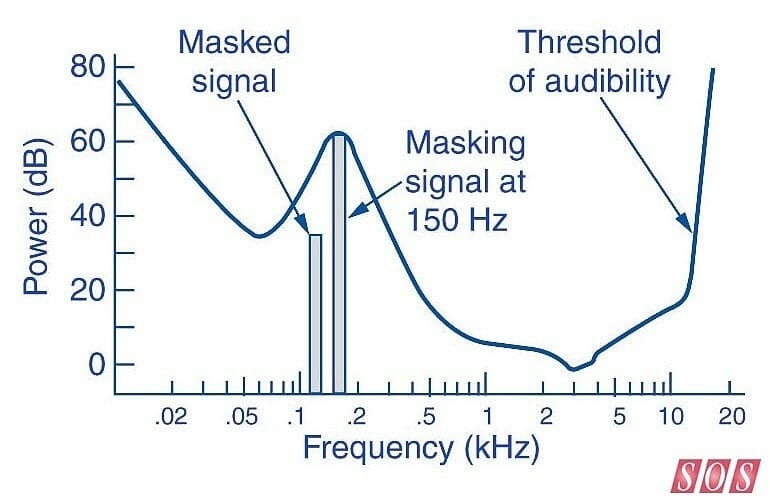
Obviously, this is a pretty undesirable effect, and it’s one of the main things to be aware of throughout the writing, recording, and mixing process. It’s also one of the main reasons EQ was developed, which can be used to carve away masking frequencies during the mixing stage.
Our audio trick? Avoid masking problems during the writing and arranging stages by using great sounds that occupy their own frequency ranges.
Even if you’ve taken precautions, masking will still sometimes occur, and can be difficult to determine why certain elements sound different soloed versus how they sound in the full mix.
Although the root notes/dominant frequencies take up most of a sound’s space, a sound’s harmonics (that also contribute to the overall timbre) also appear at different frequencies. These might be masked, which is a point where EQ might come to the rescue.
3. The ear’s acoustic reflex
When confronted with a high-intensity stimulus, the middle ear muscles involuntarily contract. This decreases the amount of vibrational energy sent to the sensitive cochlea — the part of the ear that converts sonic vibrations into electrical impulses for processing by the brain. Basically, the muscles close in order to protect the more sensitive structures of the ear.
Because of this, ear muscles respond the same way even with softer sounds (if there’s an initial loud transient followed by an immediate reduction.) The brain still interprets this as a “loud sustained noise.”
This principle is often used in cinematic sound design techniques and is particularly useful for simulating the physiological impact of massive explosions and high-intensity gunfire (without inducing hearing-damage lawsuits).
You can make an explosion appear quite loud by artificially shutting down the sound following the initial transient. The brain will immediately perceive it as louder and more intense than the sound actually is. This also works well for booms, impacts, and even drops in a club or electronic track.
4. Create power and loudness, even at low listening levels
If you take only one thing away from this article, make it this: The ears’ natural frequency response is non-linear. Our ears are more sensitive to mid-range frequencies than those that sit at the extreme high and low ends of the spectrum. We generally don’t notice this, as our brains take the mid-range bias into account. However, it becomes more apparent during mixing, where relative levels of instruments (at different frequencies) change depending on the overall listening volume.
Even though your own ears are an obstacle to achieving a perfect mix, there are simple workarounds to this phenomenon. You can manipulate the ears’ non-linear response to different frequencies and volumes in order to create an enhanced impression of loudness and punch in a mix — even when the actual listening level is low.
The Fletcher-Munson phenomenon
This non-linear hearing phenomenon was first written about in 1933 by researchers Harvey Fletcher and Wilden A. Munson. Although the data and graphs they produced have since been improved upon, they were close enough that “Fletcher-Munson” is still used as a shorthand phrase for everything related to “equal loudness contours.”
Essentially, as the actual loudness of a sound changes, the perceived loudness our brains hear changes at a different rate, depending on the frequency. This means you could listen to a mix at low volume and think it sounds great, but then listen to the same mix at a high volume and think the EQ is completely off.
Think about your audience
In certain situations (like mixing sound for films), it’s better to mix at the same level and in a similar environment to where the music will eventually be heard. This is why film dubbing theaters look like actual cinemas and are designed to essentially sound like them, too.
The best mixes result from taking the end listener and their environment into account, not necessarily mixing something that only sounds great in a million dollar studio.
So, how do our ears’ sensitivity to the mid-range manifest on a practical level? Try playing back any piece of music at a low level. Now, gradually turn it up. As the volume increases, you might notice that the “mid-boost” bias of your hearing system has less of an effect, and high and low-frequency sounds seem proportionally louder (and closer, which we’ll go into in the next tip).
Given that extremely high and low frequencies stand out more when we listen to loud sound effects, we can create the impression of loudness at lower listening levels by attenuating the mid-range and/or boosting the high/low ends of the spectrum. On a graphic EQ, it would look like a smiley face, which is why producers talk about “scooping the mid-range” to add weight and power to a mix.
How to apply this audio trick
This trick can be applied in any number of ways, from treating the whole mix to some (careful) broad EQ during mixdown/mastering to applying a “scoop” on one or two broadband instruments or mix stems (i.e. the drums and guitars submix). As you gain experience and get your head around this principle, you can build your track arrangements and choices of instrumentation with an overall frequency dynamic — right from the beginning.
This is especially effective for styles like drum and bass, where amazingly impactful and rich-sounding mixes can be achieved with just a few elements that really work the extreme ends of the frequency spectrum. The same technique also works with rock: Just listen to Butch Vig’s production on Nirvana’s “Nevermind” for a classic example of scooped mid dynamics.
Remember to be subtle: It’s easy to overdo any kind of broad frequency adjustments across a whole mix. If in doubt, leave it for mastering.
5. Equal loudness part II: Fletcher-Munson strikes back
To make things appear further away, roll off a sound’s extreme highs and lows instead of boosting them. This creates the illusion of depth in a mix, and pushes certain instruments into the imaginary distance. Then, the foreground is clear for the lead elements.
As an example, this is particularly useful for highlighting a lead vocal in front of a host of backing vocals. It’s also a solid choice for EQing drum submixes to ensure the drums are punchy but not “in your face.” A touch of reverb is also an option here, naturally.
6. Transients appear quieter than sustained sounds
The human ear doesn’t perceive short sounds as louder than sustained ones when they’re at exactly the same level. This is referred to as RMS or “root mean square” response, a mathematical means of determining average signal levels. This is the key auditory principle behind how compression makes things sound louder and more exciting without actually increasing the peak level.
Compressing the tail of a sound tricks the brain into thinking the sound is significantly louder and punchier. But the peak level — the transient — has not changed. This is how compressors allow you to squeeze every ounce of available headroom out of your sounds and mix. Just be careful not to “flatline” your mix with too much compression.
7. Reverb early reflection “ambience” for thicker sounds
If you combine part of the Haas effect principle with our previous tip on sustained sounds, you’ll already understand how adding early reflections from a reverb plugin can attractively thicken sounds.
This can be used to multiply and spread the initial transient attack of a sound over a very short amount of time. By extending this louder part of the sound, we’ll get a slightly thicker sound, but in a very natural, ambient way that can be sculpted and tonally fine-tuned with various reverb controls. With the distancing and diffusion effects of a long tail, you can retain the upfront character of a sound.
8. Decouple a sound from its source
The source of a sound and how it is perceived in a final context can be completely different things.
This principle is liberally exploited in movie sound effects design, where the best sound designers are able to completely dissociate the sonic qualities of a sound from its original source. This is how Oscar-winning Ben Burtt came up with the iconic Star Wars lightsaber sound:
“I had a broken wire on one of my microphones, which had been set down next to a television set and the mic picked up a buzz, a sputter, from the picture tube – just the kind of thing a sound engineer would normally label a mistake. But sometimes bad sound can be your friend. I recorded that buzz from the picture tube and combined it with the hum [from an old movie projector], and the blend became the basis for all the lightsabers.”
– Ben Burtt, The Sounds of Star Wars
The ends really can justify the means
Whether you’re creating sound effects for film or mixing a rock band, you don’t have to settle for the raw or instrument sounds you started with. If you find that kitchen pans give you sounds that fit your track better than an expensive, tuned drum kit, use them! If you discover pitched elephant brays are the perfect addition to your cut-up dubstep bass line (it worked for Skrillex) then by all means, herd them in.
The only thing that matters is the perceived end result. No one’s ears care how you got there. They’ll be subliminally much more excited and engaged by sounds coming from an unusual source, even if said sounds take the place of a conventional instrument.
9. How to make a mix sound fuller
Our ears can have trouble deciphering where one sound ends and another similar one begins, but they’re incredibly forgiving when it comes to layered sounds. When done carefully — even across wide ranges of the frequency spectrum — the separate components will read as one big, textured sound.
Books like Practical Art of Motion Picture Sound discuss creating layered sound effects as though they are chords. A single effect is made up of several individual sounds, each of which occupy their own frequency range (this is key to avoid masking sounds).
Use this technique to layer stacks of guitar or synth parts into towering walls of sound that can then be spread across the stereo field with the Haas effect. The possibilities for tricking our ears are endless!
For more sound design tips, here’s a list of quick ways to make your beats sound more human.